Brochure Bleed Size
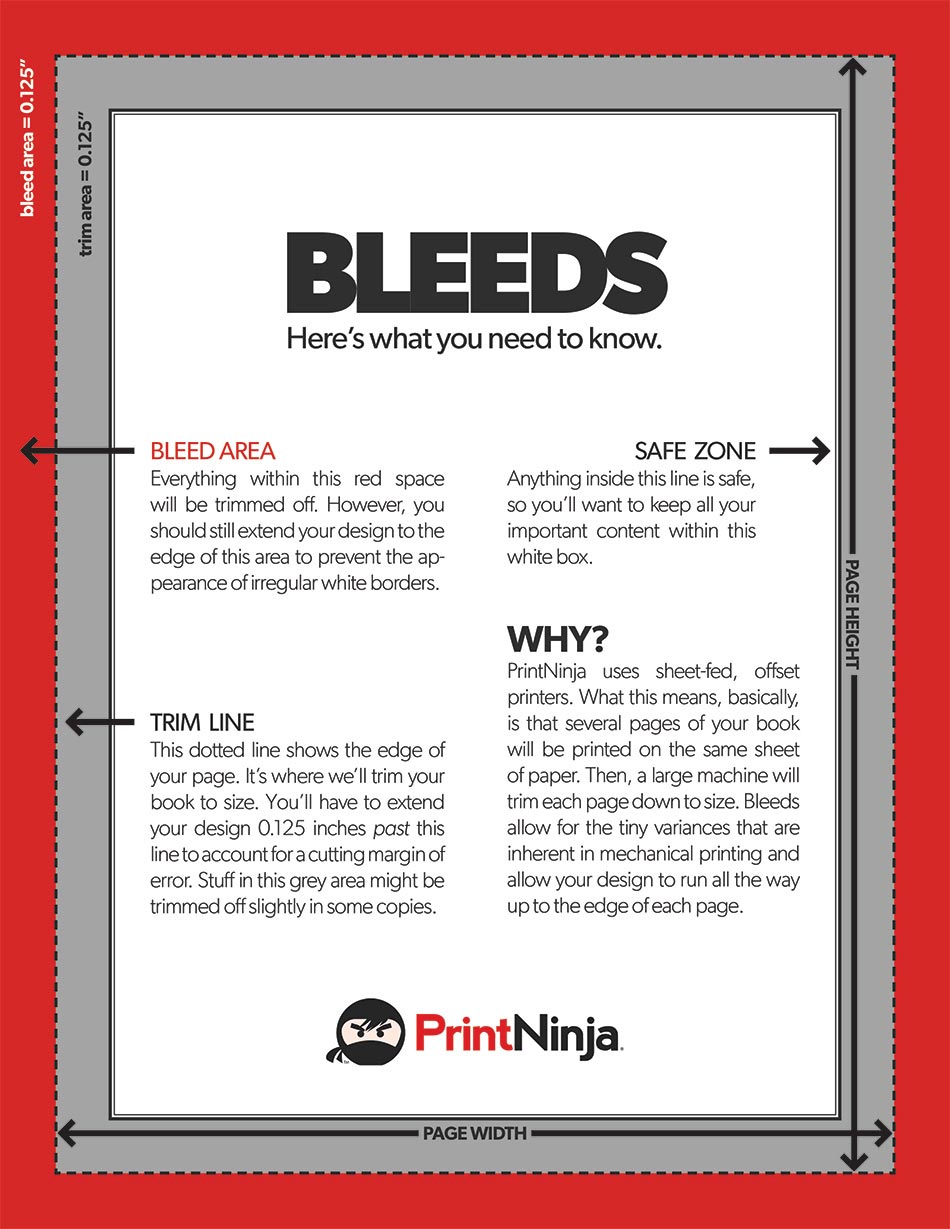
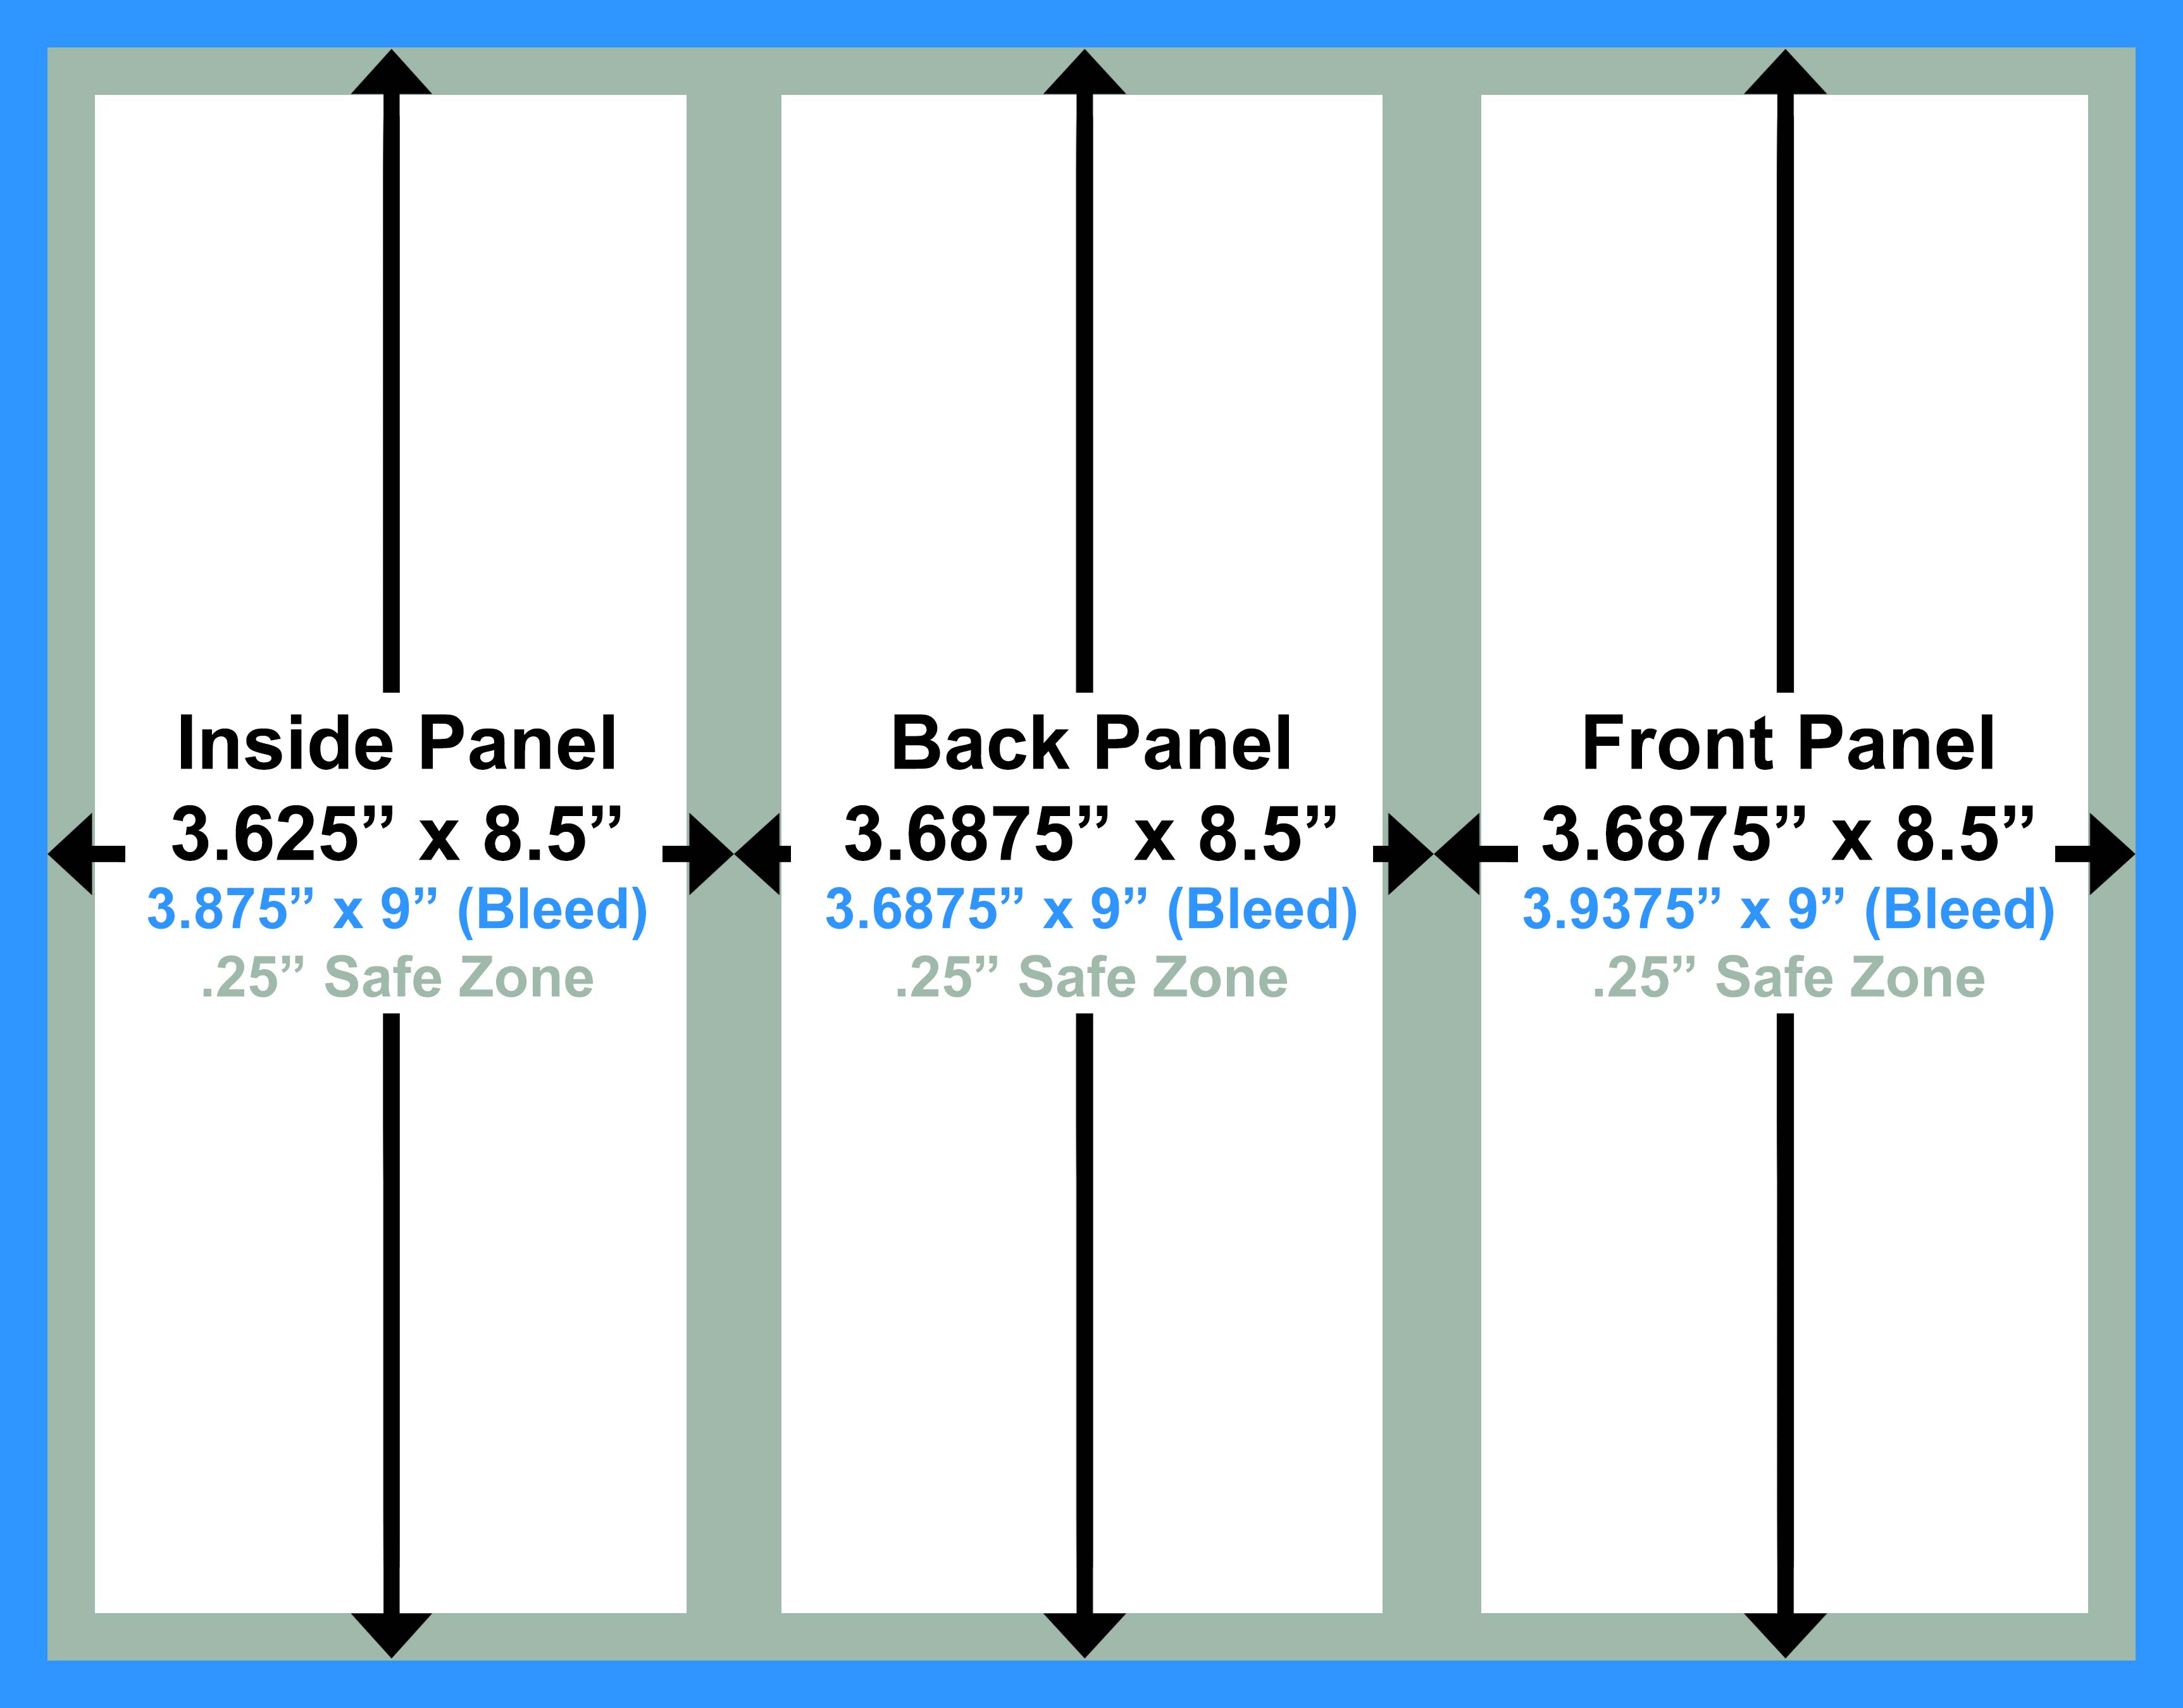
Brochure Bleed Size - Guidelines for a margin on the inside, edge of the page and 3mm bleed. Adobe indesign allows for a bleed area by setting. The final product size would still be 8.5”x11”,. Therefore, if an 8.5″ x 11″. This means that if your finished flyer is 8.5″. For each of these finishingsteps, there is a certain margin of error. In new zealand, standard bleed is 3mm. Bleed makes it easier to avoid issues with: Partial bleed shows that only some elements will be shown to the edge, leaving a white space margin. Specifies the overall size of the brochure including bleed. This extra space allows for slight variations in the cutting process, ensuring that the design extends seamlessly. The recommended bleed size for a professional printing is 1/8 inch, or.125”. When designing a page using printed bleed, most printers allocate an extra 3mm on all sides, except for large format posters. For most printing projects, we recommend a standard bleed area of 0.125 inches (3mm) on all sides of your document. Specifications for the size of the brochure including bleed allowances. The bleed is the extension of the print by 1/8″ (0.125″) on all sides of a document that won’t be in the final printed product. Bleed is the extra space around your document that ensures your design or background extends right to the edge after trimming. How much bleed do i need? For example, a letterhead sheet that incorporates bleed in its design will be 8.75 x 11.25 before being trimmed to a finished size of 8.5 x 11. For each of these finishingsteps, there is a certain margin of error. For each of these finishingsteps, there is a certain margin of error. Indicates the extension area for images. How much bleed for print? Since the bleed area will be. The safety margin should be 0.125 inches (or 3mm) on. You can also use a. Create a “safe zone” within the document, typically 0.25 inches from the. However, to make an impact, you must get the. The minimum amount of bleed should be around 0.125 (3mm) outside your document final size, ideally 0.25 (6mm). Remember, bleed needs to be present. Guidelines indicating the minimum distance for text and graphics. Create a “safe zone” within the document, typically 0.25 inches from the. Bleed is the extra space around your document that ensures your design or background extends right to the edge after trimming. Primarily, a standard bleed in the us is.125”, meaning if your page size was 8.5”x11”, you would then. That leaves 1/8 of an inch around each of the edges for the bleed. Once a job has been printed, the press sheets need to be folded, bound, and trimmed. The behavior of the paper when running at high speed through a machine 3. You can also use a. Since the bleed area will be. However, to make an impact, you must get the. You can also use a. Each printer has his own requirement for this. Specifications for the size of the brochure including bleed allowances. Therefore, if an 8.5″ x 11″. Therefore, if an 8.5″ x 11″. Primarily, a standard bleed in the us is.125”, meaning if your page size was 8.5”x11”, you would then add.125” to each side. Specifies the overall size of the brochure including bleed. Bleed makes it easier to avoid issues with: This will accommodate for most of your printed products. Bleed is a printing term used to indicate the area with a background image that will be trimmed off after the job is printed and cut down to the finished size. This means that if your finished flyer is 8.5″. The typical bleed size is 1/8 inch (0.125 inches) or 3 mm. Bleed makes it easier to avoid issues with:. For example, a letterhead sheet that incorporates bleed in its design will be 8.75 x 11.25 before being trimmed to a finished size of 8.5 x 11. This means that if your finished flyer is 8.5″. Each printer has his own requirement for this. The minimum amount of bleed should be around 0.125 (3mm) outside your document final size, ideally. The typical bleed size is 1/8 inch (0.125 inches) or 3 mm. Specifications for the size of the brochure including bleed allowances. In contrast, a piece with no bleed keeps all the. Specifies the overall size of the brochure including bleed. Indicates the extension area for images. Partial bleed shows that only some elements will be shown to the edge, leaving a white space margin. Primarily, a standard bleed in the us is.125”, meaning if your page size was 8.5”x11”, you would then add.125” to each side. The bleed is the extension of the print by 1/8″ (0.125″) on all sides of a document that won’t be. In contrast, a piece with no bleed keeps all the. With the bleed, most business card design files or templates will measure 3.75 inches by 2.25 inches. This means that if your finished flyer is 8.5″. Specifications for the size of the brochure including bleed allowances. Each printer has his own requirement for this. For example, a letterhead sheet that incorporates bleed in its design will be 8.75 x 11.25 before being trimmed to a finished size of 8.5 x 11. The minimum amount of bleed should be around 0.125 (3mm) outside your document final size, ideally 0.25 (6mm). For an 8.5 x 11 inch brochure, the bleed should be 0.125 inches (or 3mm) on each side, making the design size 8.75 x 11.25 inches. This extra space allows for slight variations in the cutting process, ensuring that the design extends seamlessly. Bleeds extend beyond the final trim size of your document, while margins are the inner space. You can also use a. Bleed makes it easier to avoid issues with: How much bleed for print? Bleed measurement bleed measurement is not the same everywhere. Once a job has been printed, the press sheets need to be folded, bound, and trimmed. Adobe indesign allows for a bleed area by setting.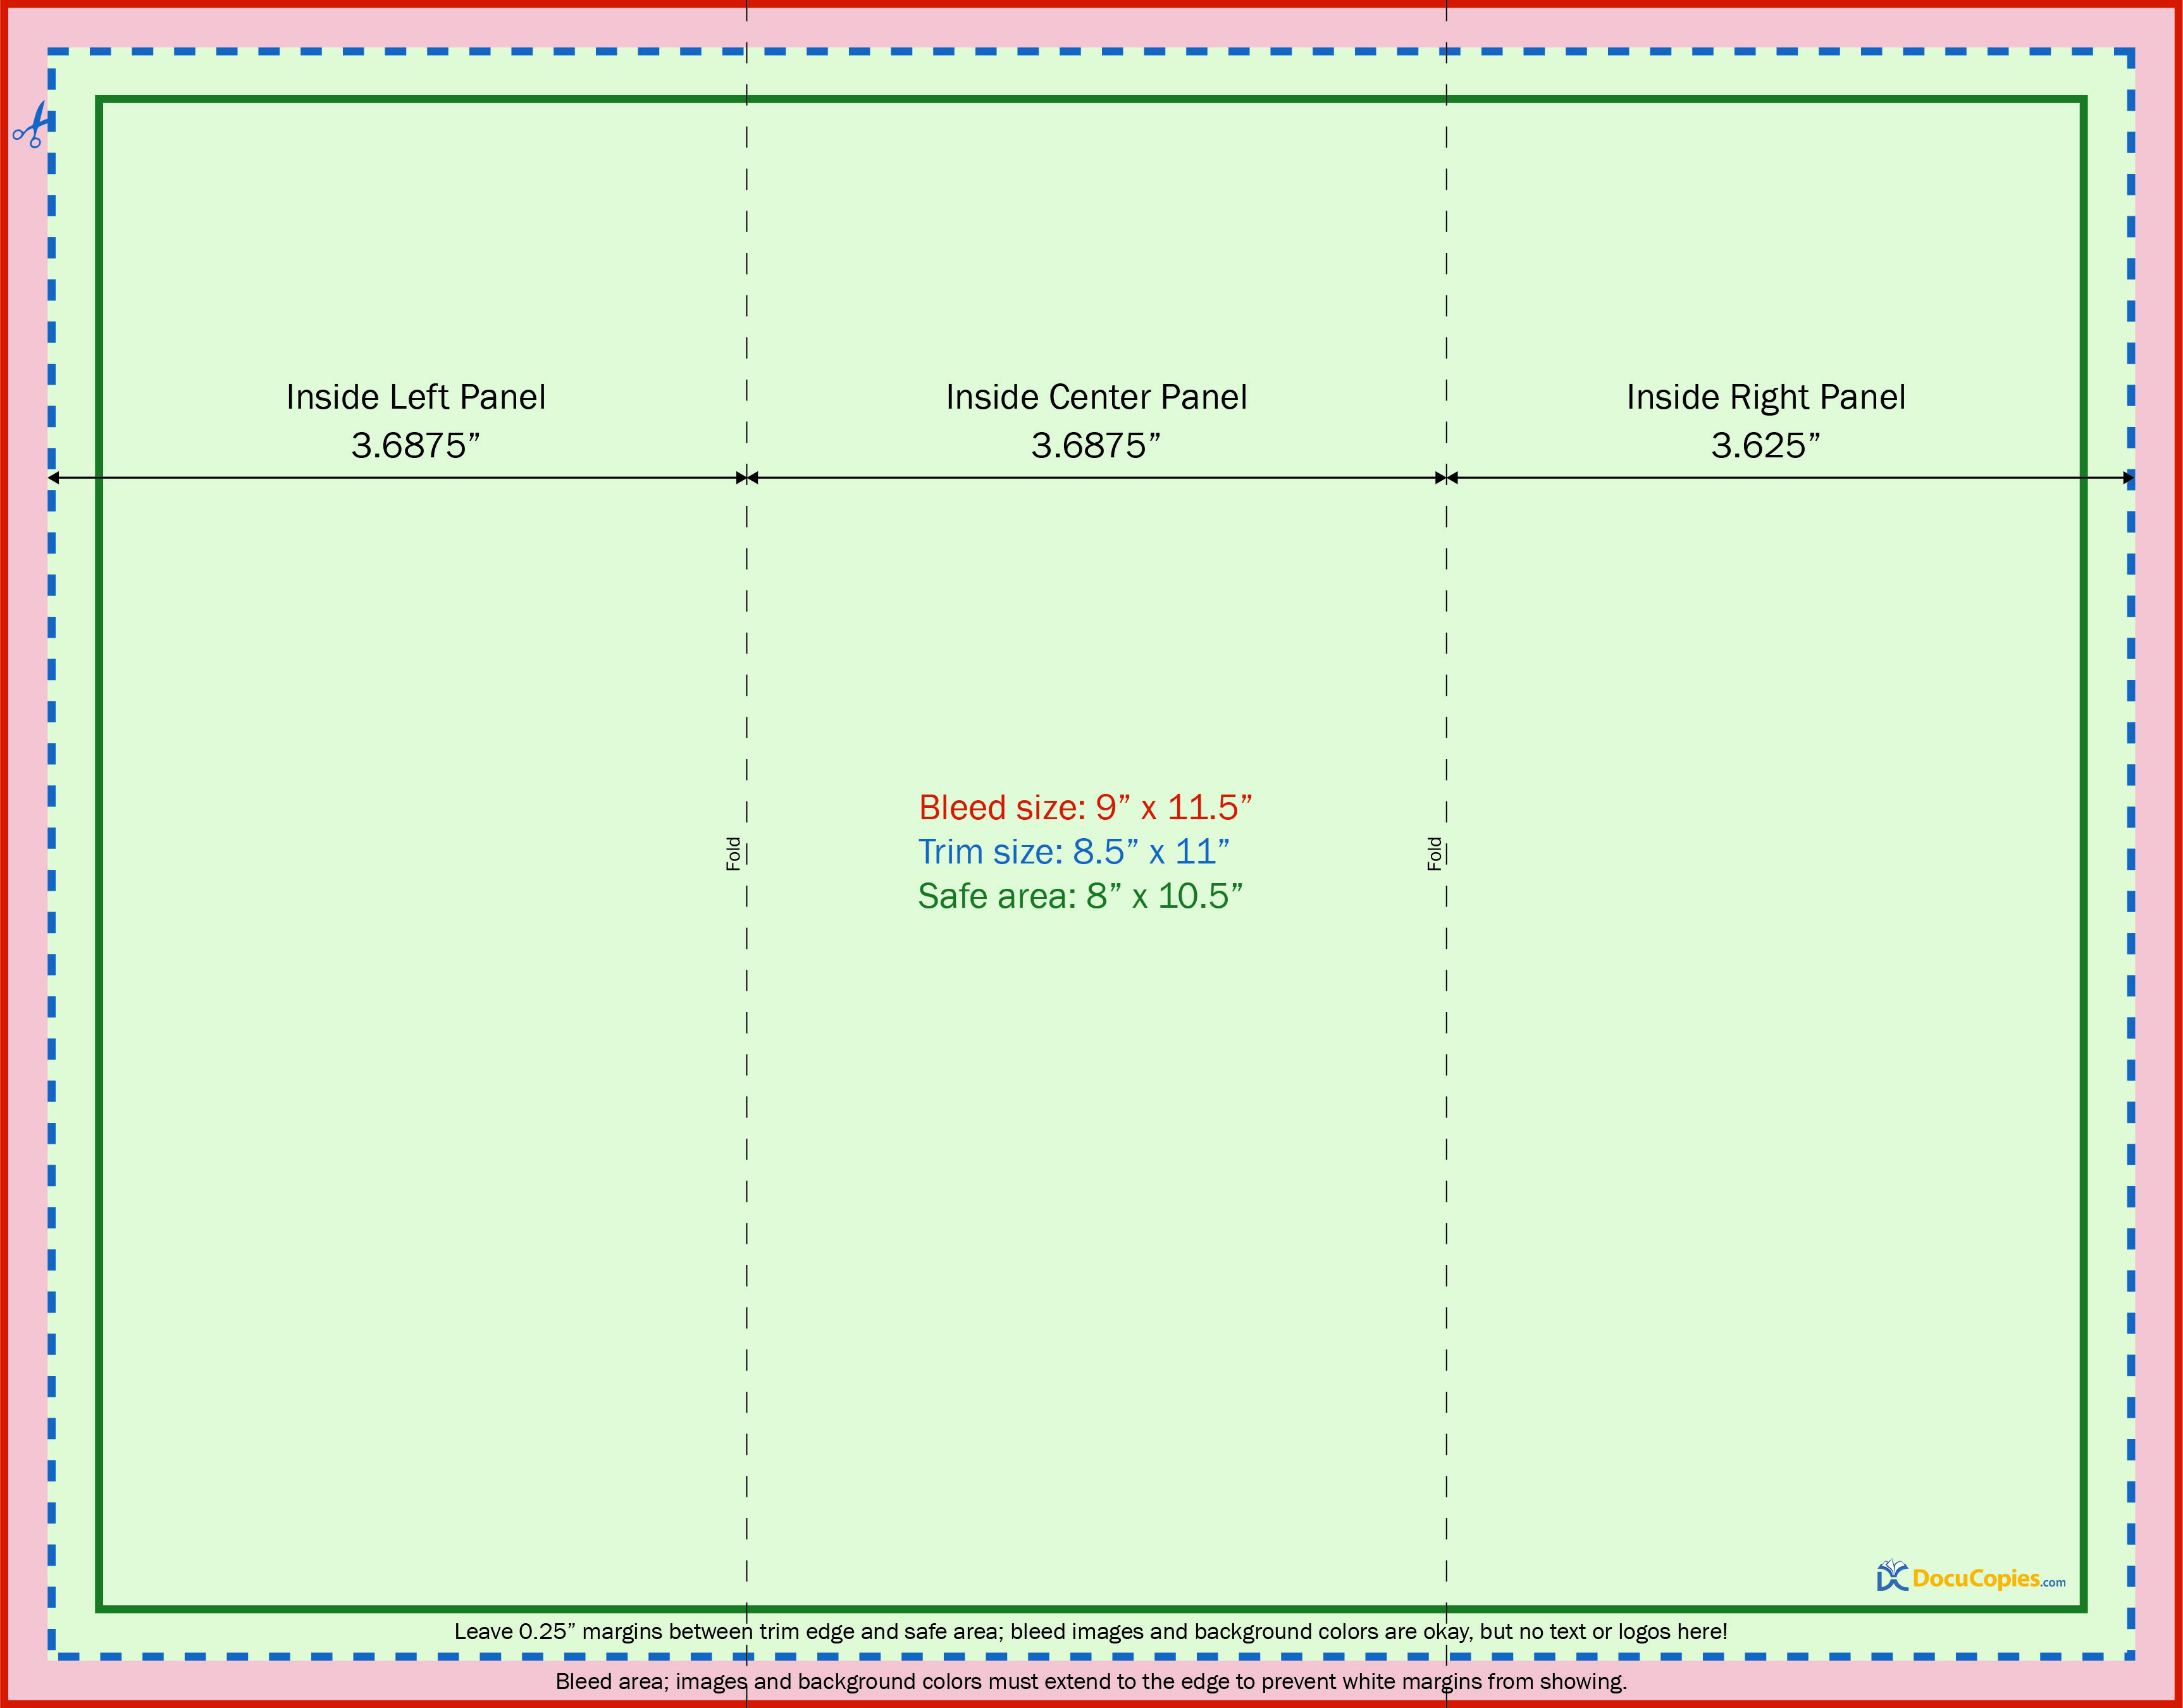
How to Design Brochures for Print Trifold template setup help
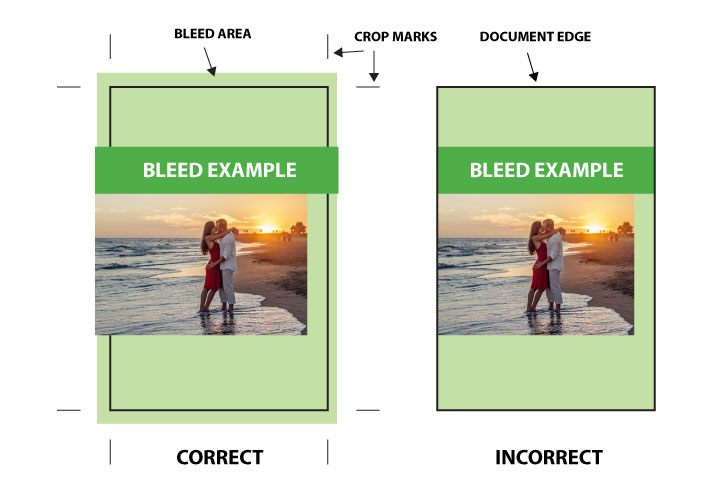
Full Bleed Printing Explanation and Tutorial

What Is Full Bleed Printing?
How to Design Brochures for Print Trifold template setup help
What is bleed? How do I set up bleed for printing? Printing by Tank
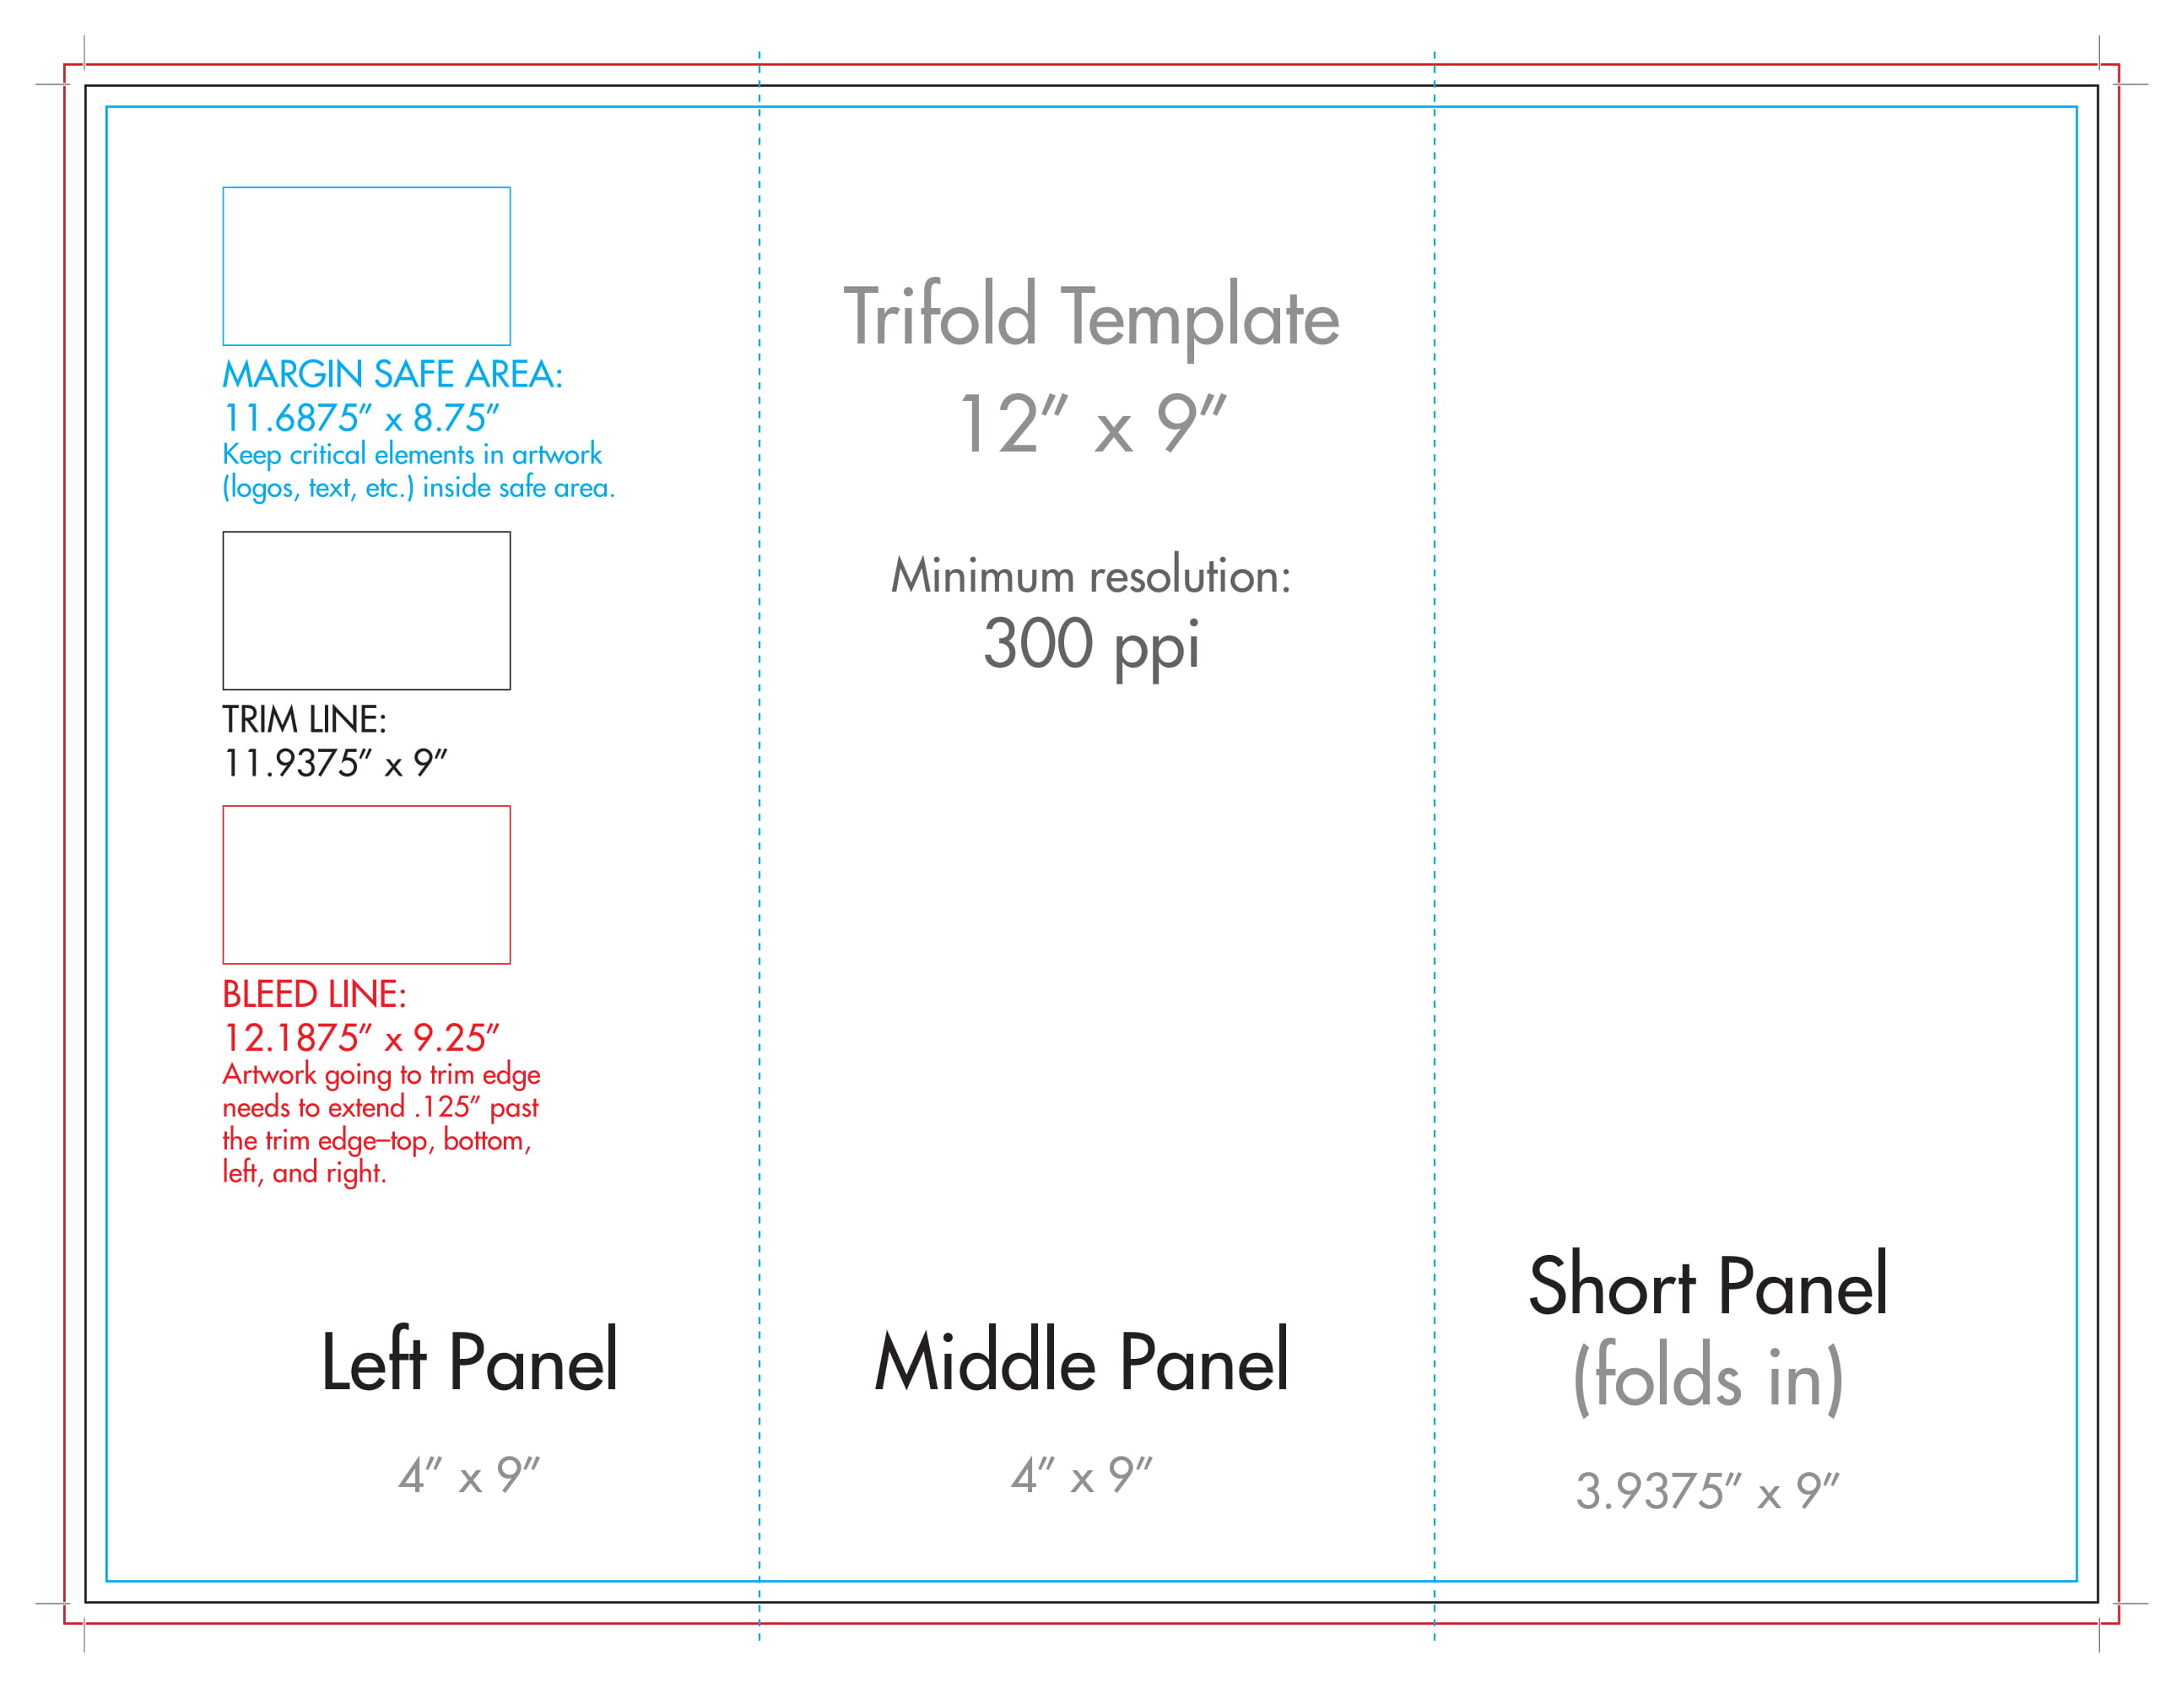
12" x 9" Trifold Brochure Template

Full Bleed instructions for printready PDFs Lulu

print design How can I determine how much bleed to use? Graphic
How To Set Up Margins and Bleed Sure Print & Design
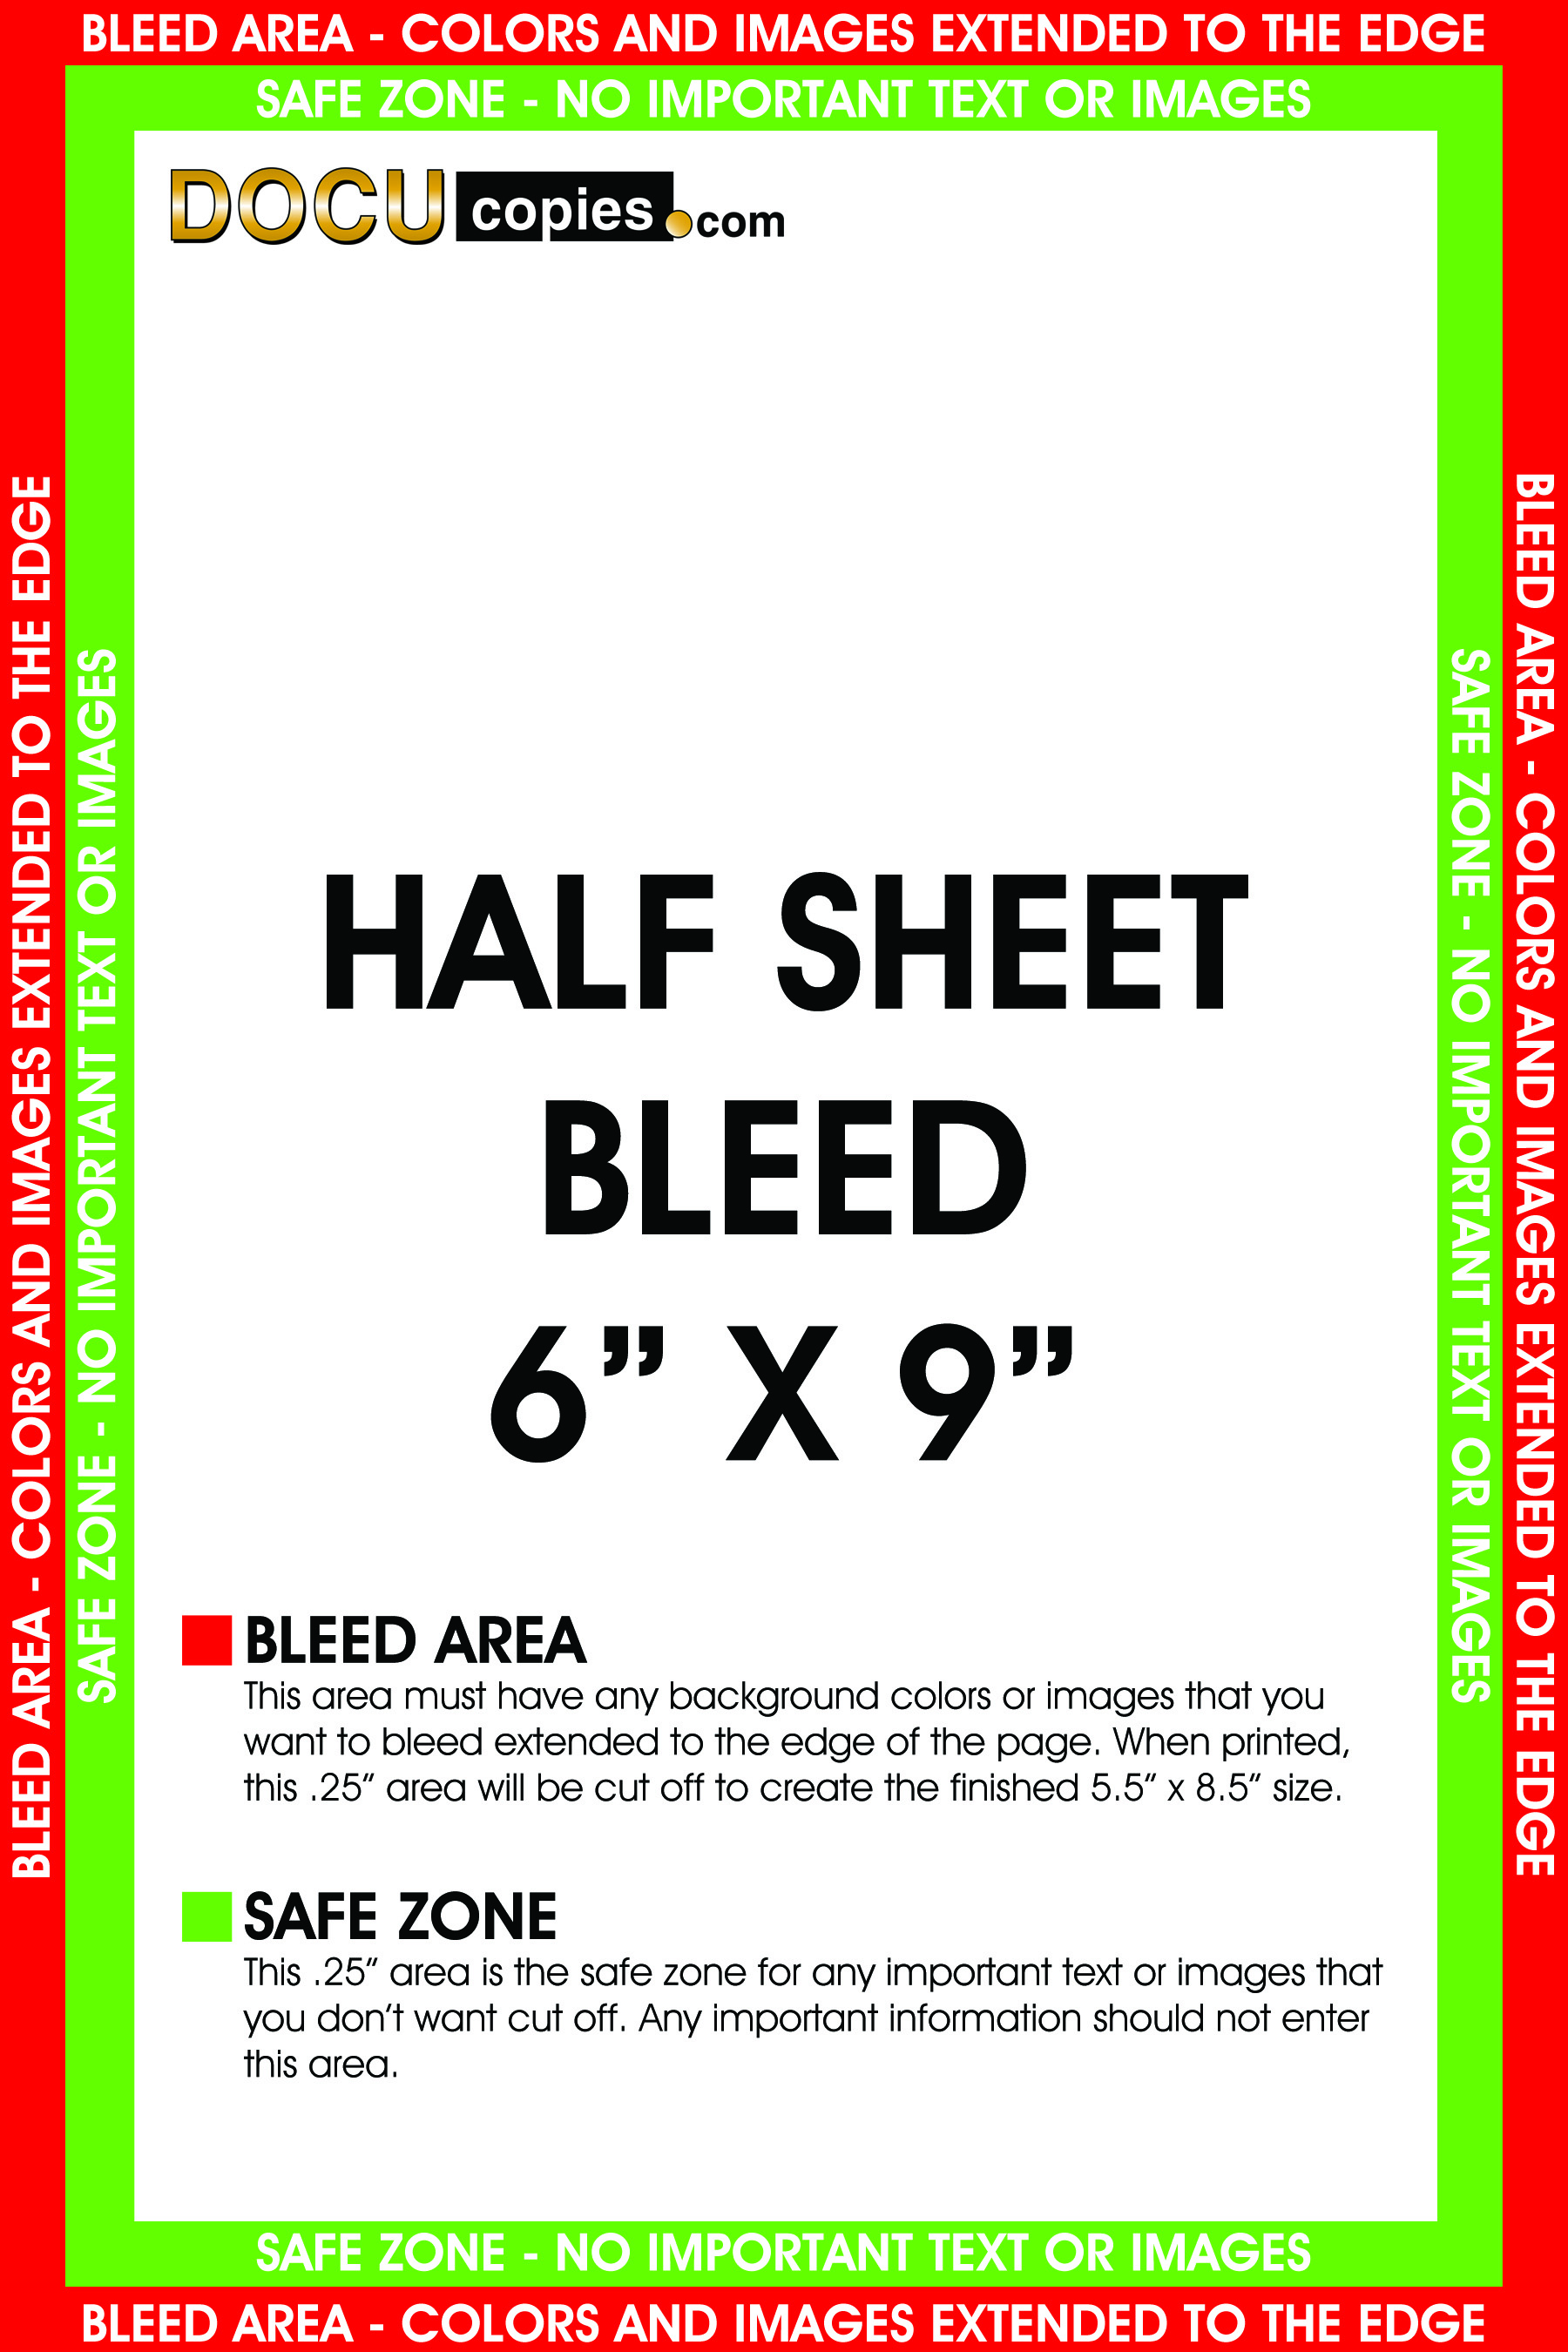
Bleed Setup Help How to setup print files for bleeds
Indicates The Extension Area For Images.
Since The Bleed Area Will Be.
In A Nutshell, Especially With Large Quantities And Thick Brochures, Extra (Usually 3Mm) Material All.
The Bleed Is The Extension Of The Print By 1/8″ (0.125″) On All Sides Of A Document That Won’t Be In The Final Printed Product.
Related Post: